As an air purifier enthusiast, I have discovered that maintaining the filter in my Hunter Air Purifier is crucial for optimal performance.
In this article, I will guide you through the process of changing the filter step by step.
By understanding the importance of filter maintenance and following the correct procedures, you can ensure that your air purifier continues to provide clean and fresh air for your living space.
Let’s dive right in and learn how to keep your Hunter Air Purifier running smoothly.
Key Takeaways
- Regular filter maintenance is important for improving air quality and maintaining optimal filter function.
- It is essential to identify the correct filter for your specific Hunter Air Purifier model to ensure effective filtration.
- When changing the filter, remember to turn off and unplug the unit, remove the old filter without touching the dirty surface, and dispose of it properly.
- When installing the new filter, make sure it fits securely, close the compartment door tightly, and verify an airtight seal to prevent air leakage.
Top picks for "hunter purifier change"
As an affiliate, we earn on qualifying purchases.
Understanding the Importance of Filter Maintenance
Understanding the importance of filter maintenance is crucial for keeping your Hunter air purifier running efficiently. Regular filter cleaning offers numerous benefits that help to improve the air quality in your home.
When the air filter becomes clogged with dirt, dust, and other pollutants, its ability to trap airborne particles diminishes significantly. This can lead to reduced air flow and decreased performance of your air purifier. By regularly cleaning the filter, you ensure that it functions optimally, removing harmful particles from the air effectively.
Some common signs of a clogged air filter include decreased airflow, increased noise levels, and a noticeable decline in the air purifier’s performance. By recognizing these signs and maintaining your filter regularly, you can enjoy cleaner and healthier air in your home.
Identifying the Correct Filter for Your Hunter Air Purifier
To ensure you select the right filter for your Hunter air purifier, check the model number on the back of the unit. Choosing compatible filters is essential for optimal performance and clean air in your home.
Here are three important things to consider when selecting a filter:
-
Filter type: Different Hunter air purifier models require specific filter types, such as HEPA, carbon, or pre-filters. Understanding your model’s requirements will ensure effective filtration and removal of pollutants like dust, pet dander, and allergens.
-
Filter lifespan: Filters have a recommended lifespan, typically ranging from 3 to 12 months. It’s important to replace filters regularly to maintain their efficiency and prevent clogging. Neglecting to change filters can result in reduced air quality and increased strain on the purifier.
-
Filter availability: Ensure the filters you need are readily available. Check with authorized dealers or the manufacturer’s website for easy access to replacement filters.
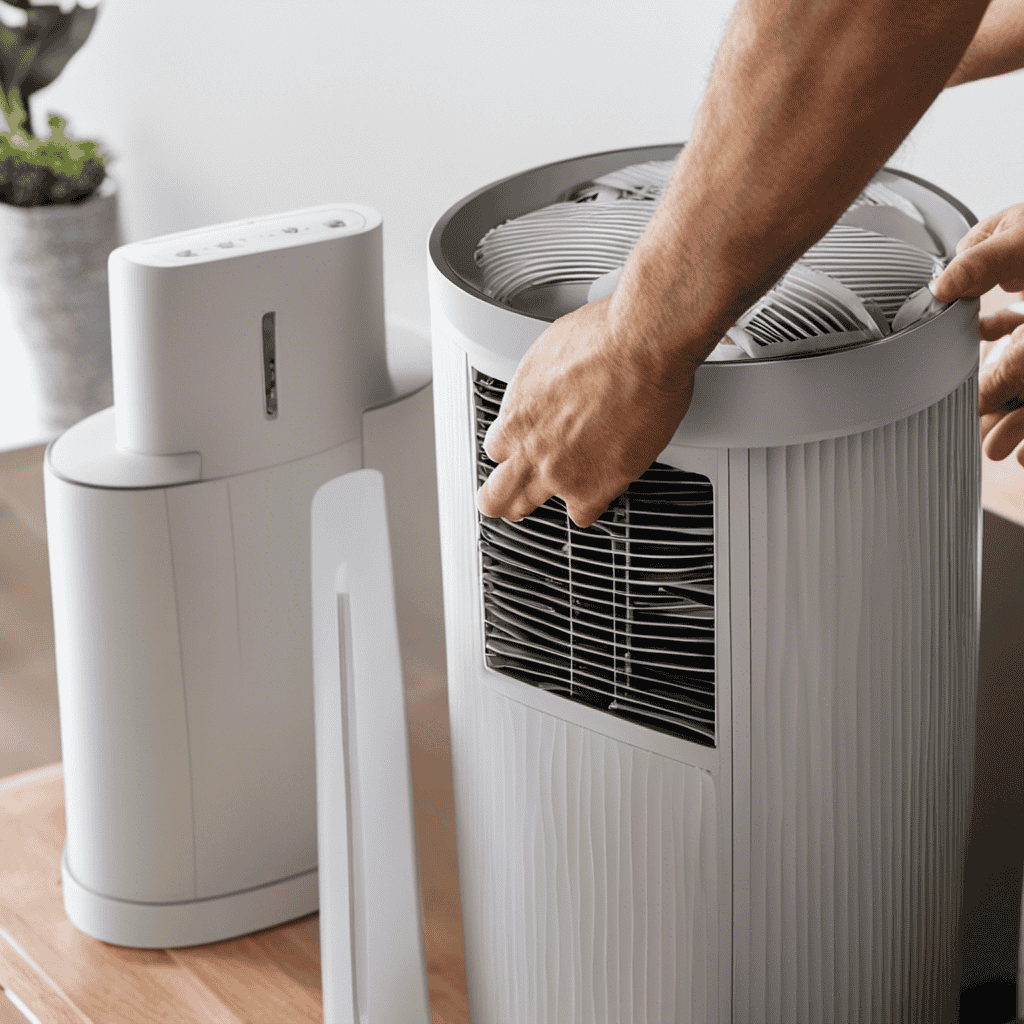
Step-by-Step Guide to Removing the Old Filter
When removing the old filter, you’ll want to make sure the unit is turned off and unplugged for safety. This is a crucial step to prevent any accidental damage or injury.
Once you’ve ensured the safety precautions, you can begin the process of changing the filter. Here are step-by-step instructions to guide you through the process:
-
Locate the filter compartment: Depending on your specific model, the filter compartment may be on the front, back, or sides of the unit. Consult your owner’s manual if you’re unsure.
-
Open the compartment: Most Hunter air purifiers have a latch or button that allows you to easily open the filter compartment.
-
Remove the old filter: Carefully take out the old filter by pulling it straight out. Avoid touching the dirty surface of the filter to prevent spreading contaminants.
-
Dispose of the old filter: Place the old filter in a plastic bag and seal it before disposing of it in the appropriate waste bin.
-
Install the new filter: Take the new filter out of its packaging and insert it into the filter compartment, following the arrows or indicators for proper orientation.
-
Close the compartment: Once the new filter is securely in place, close the compartment and ensure it is properly sealed.
Common mistakes to avoid:
- Forgetting to turn off and unplug the unit before removing the filter can lead to electrical hazards.
- Mishandling the old filter can release contaminants back into the air.
- Installing the new filter incorrectly can result in decreased performance and efficiency.
Installing the New Filter in Your Hunter Air Purifier
Once you’ve disposed of the old filter, it’s time to insert the new one into the compartment and ensure it is properly sealed. Replacing filters is an important part of the maintenance procedures for your Hunter air purifier.
Here’s a step-by-step guide to help you install the new filter correctly:
-
Remove the packaging: Take the new filter out of its packaging, making sure to handle it carefully to avoid damaging it.
-
Position the filter: Locate the filter compartment in your air purifier and gently slide the new filter into place. Ensure that it fits snugly and securely.
-
Seal the compartment: Close the compartment door, making sure it is securely latched. This will ensure an airtight seal and prevent any air leakage.
By following these steps, you can ensure that your new filter is properly installed and ready to effectively purify the air in your home.
Remember to regularly replace your filters to maintain the optimal performance of your Hunter air purifier.
Tips for Extending the Lifespan of Your Air Purifier Filter
Regularly cleaning your air purifier filter can help prolong its lifespan and maintain its effectiveness. When it comes to increasing filter efficiency, cleaning is often a more cost-effective option compared to replacing filters.
Cleaning your air purifier filter removes dust, dirt, and other particles that can clog the filter and reduce its ability to capture pollutants. To clean the filter, start by turning off the air purifier and unplugging it from the power source. Gently remove the filter from the unit and use a soft brush or vacuum cleaner to remove any loose debris.
If the filter is washable, rinse it with water and mild soap, then allow it to air dry completely before reinstalling.
Regularly cleaning your air purifier filter not only helps maintain its effectiveness but also extends its lifespan, saving you money in the long run.
Frequently Asked Questions
How Often Should I Change the Filter in My Hunter Air Purifier?
I change the filter in my Hunter air purifier every 3-6 months. It’s important to clean it regularly to maintain optimal air quality. Make sure to use the specific filter recommended by the manufacturer.
Can I Use Any Brand of Filter in My Hunter Air Purifier, or Does It Have to Be a Specific Hunter Filter?
Yes, you can use alternative filter options in your Hunter air purifier, but it is recommended to use a specific Hunter filter. Using a Hunter filter ensures optimal performance and maximizes the benefits of your air purifier.
Is It Necessary to Turn off the Air Purifier Before Changing the Filter?
It is safe to change the filter in a running air purifier, but it is recommended to turn it off first to avoid potential risks. Changing the filter without turning off the purifier can lead to electrical accidents or damage to the unit.
Can I Clean and Reuse the Old Filter Instead of Replacing It With a New One?
No, it is not recommended to clean and reuse the old filter. Cleaning efficiency may decrease and filter maintenance may become difficult. It is best to replace the old filter with a new one for optimal performance.
How Can I Tell When the Filter in My Hunter Air Purifier Needs to Be Replaced?
When my Hunter Air Purifier’s filter needs replacing, signs and symptoms become evident. The air quality decreases, there’s a decrease in airflow, and an increase in dust and allergens.
Conclusion
In conclusion, maintaining and changing the filter in your Hunter Air Purifier is essential for optimal performance and clean air in your home. By following the step-by-step guide and ensuring you have the correct filter, you can easily replace the old one with a new filter.
Remember to regularly clean and replace the filter to extend its lifespan and keep your air purifier working efficiently. As the saying goes, ‘Out with the old, in with the new’ – embrace clean air and a healthier living environment!