
TL;DR
A closet rig works best as an absorption-focused vocal booth rather than a true soundproof room. Proper placement, materials, and ventilation are key to creating a quiet, echo-free space for recording at home.
Imagine turning a tiny closet into a professional-sounding vocal booth. It’s possible, but not just with foam and blankets. The secret lies in understanding how sound behaves in small spaces, how to place your treatment, and how to keep your equipment cool. If you’re tired of echoes, noise leaks, or muffled recordings, this guide will show you how to optimize your closet setup for clarity and quiet.
Whether you’re a podcaster, voice-over artist, or home studio enthusiast, knowing where to treat, how to position your mic, and how to ventilate is the real game changer. Let’s crack the code on making a closet work as a serious recording space — without breaking the bank or turning it into a sauna.
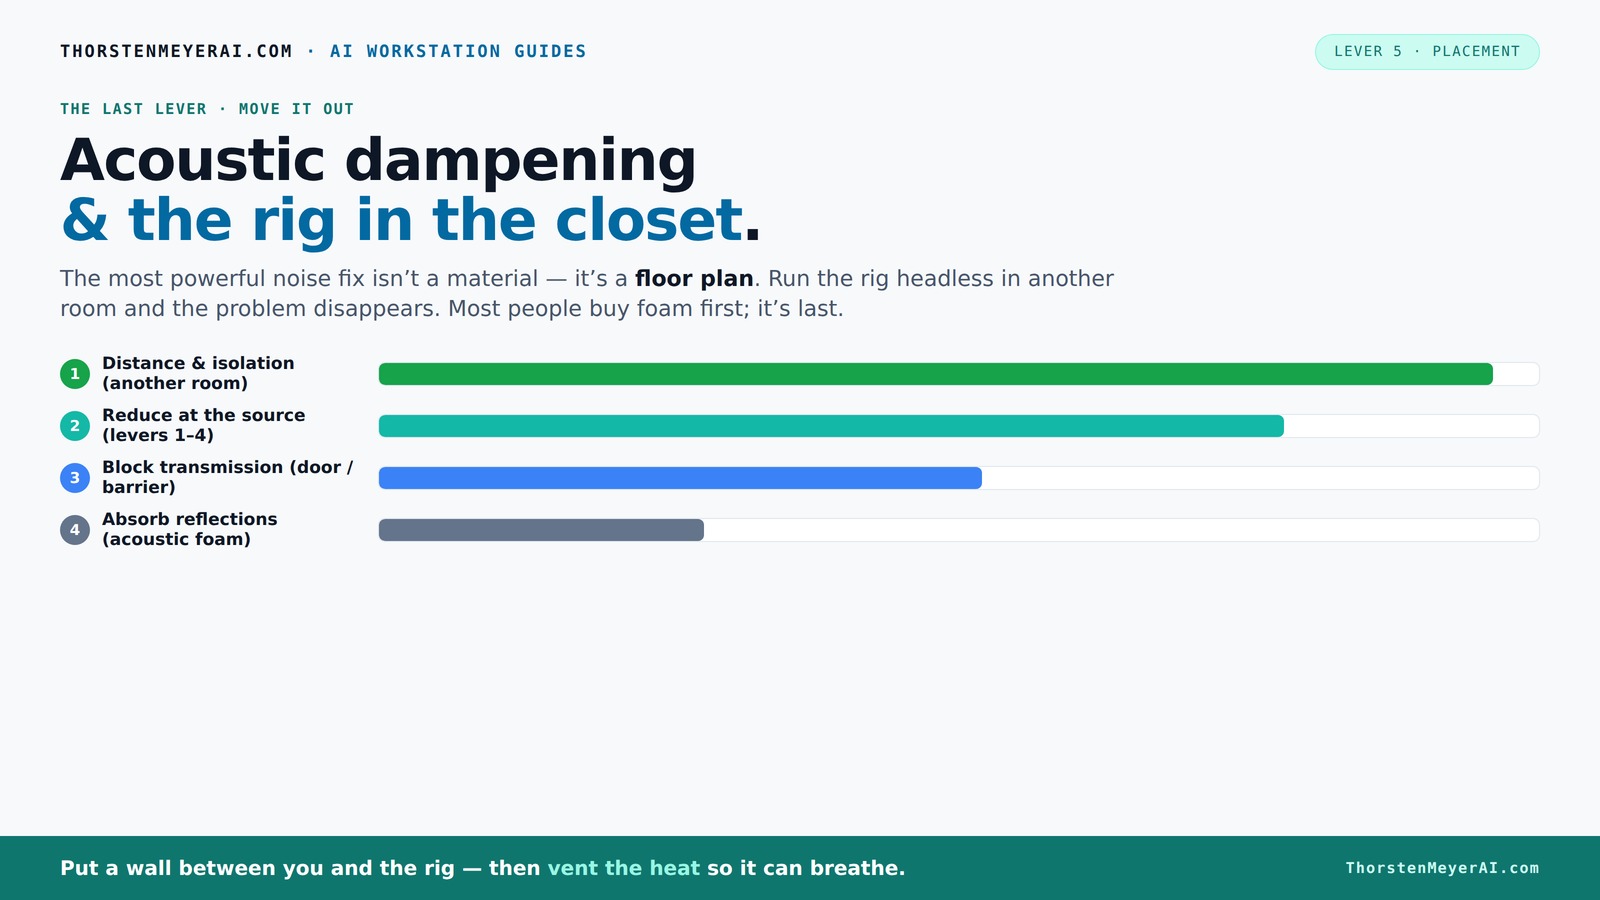
Acoustic dampening
& the rig in the closet.
The most powerful noise fix isn’t a material — it’s a floor plan. A rig you can’t hear because it’s in another room beats any amount of foam. Tap the approaches in Part 1 to see what actually works.
(another room)
(levers 1–4)
(door / barrier)
(acoustic foam)
Contain the noise, not the heat
Key Takeaways
- Treat the primary reflection points, especially behind your mic, to cut harsh echoes.
- Sealing gaps around the door and vents reduces noise leaks more than foam alone.
- Use broad coverage of soft materials rather than focusing only on corners in small rooms.
- Proper ventilation is essential — a sealed closet traps heat and can damage your equipment.
- A hybrid approach of absorption, sealing, and ventilation outperforms single fixes.
home vocal booth acoustic treatment
As an affiliate, we earn on qualifying purchases.
As an affiliate, we earn on qualifying purchases.
Why a closet isn’t just a tiny room — it’s a secret weapon for sound
Most people think bigger is better for soundproofing, but in reality, the small, enclosed space of a closet can be a huge advantage. It’s easier to control reflections and echoes when the room is tiny, and understanding how acoustic treatment works can help you optimize your space. The limited space means sound waves have less room to bounce around, reducing reverberation and making your recordings clearer. You can learn more about acoustic panel options for small spaces. Additionally, sealing gaps around the door and lining the walls with soft materials transforms it into a mini vocal booth that traps sound more effectively than a large, open room.
For example, hanging a blanket over the door and adding foam panels to the walls can cut reverb by 80%. This isn't just about noise reduction; it’s about creating a controlled acoustic environment that emphasizes clarity. The key is understanding that small spaces inherently limit sound reflections, but only if you treat those reflections properly. Without proper treatment, small rooms can also cause issues like standing waves or muddiness, so strategic placement and material choice are essential.
Acoustic dampening vs. soundproofing — what really matters in a closet
Understanding the distinction between dampening and soundproofing is crucial because they serve different purposes, and in a small closet, knowing which to prioritize can make or break your setup. For detailed guidance, see this DIY acoustic guide. Acoustic dampening focuses on reducing internal reflections and echoes, which directly impact the clarity and warmth of your recordings. It involves absorbing sound waves so they don’t bounce endlessly inside the space, preventing muddiness and harshness. Soundproofing, however, aims to block sound from escaping or external noise from entering, which is often more challenging and resource-intensive.
In a closet, your primary concern is usually dampening — making the sound inside the space sound better. This is achieved with foam, blankets, and strategic placement of absorption materials. However, neglecting soundproofing can lead to noise leaks, especially if your closet is near noisy appliances or outside traffic. The tradeoff is that comprehensive soundproofing can be complex and costly, involving sealing every crack and adding mass to walls. Therefore, a balanced approach—using dampening to improve sound quality and sealing gaps to contain sound—is typically the most practical for home setups.
Recognizing this distinction helps you set realistic expectations. While you might not achieve complete sound isolation, you can significantly improve the quality of your recordings and reduce noise intrusions by focusing on the right techniques for your specific needs.
Where to place foam, blankets, and panels for the best sound inside your closet
Placement is everything because sound reflections happen at specific points where sound waves bounce off surfaces. Check out diffuser panels for better sound diffusion. The most critical areas to treat are the primary reflection points: behind the microphone and the wall directly facing it. Proper placement of acoustic panels or foam at these spots can dramatically improve sound clarity by minimizing early reflections that cause harshness and muddiness. For instance, placing a panel about 6 inches behind your mic can absorb the sound waves before they bounce back into the capsule, resulting in a cleaner recording.
In small closets, covering the ceiling, side walls, and even the door with blankets or foam panels can be highly effective. This broad coverage helps to diffuse and absorb sound from multiple angles, which is essential because small spaces tend to reflect sound in complex ways. Instead of focusing solely on corners—which are traditionally bass trap hotspots—prioritize treating the main reflection points and surrounding surfaces to achieve a more balanced sound.
Think of it as sculpting the acoustics: you want to eliminate the reflections that cause coloration and echo. Use a combination of placement and coverage to create a controlled environment where your voice is captured clearly and naturally, without harshness or muddiness.
Materials that turn a closet into a sound-friendly space
Choosing the right materials is about understanding their acoustic properties and how they fit into your specific space and budget. Learn more about decorative acoustic panels for stylish sound treatment. Acoustic panels are designed to absorb mid and high frequencies, coming in various thicknesses—2-inch panels are often sufficient for small spaces, effectively reducing harshness without overwhelming the room. The key is to select materials that match the frequency range you need to control, especially if your voice has a lot of sibilance or harsh consonants.
Blankets and moving blankets are popular DIY options because they are versatile, easy to hang, and absorb a wide range of frequencies. Their effectiveness depends on how much air gap you leave behind them; more space allows sound waves to dissipate better. Rugs and carpets on the floor are also critical because they reduce reflections from below, which can otherwise add muddiness to recordings.
While foam is common, it’s primarily for absorption rather than soundproofing. The tradeoff is that foam alone won’t block sound leaks but can significantly improve internal acoustics. Combining soft, absorptive materials with sealing gaps around the door and vents is the most effective approach. This combination allows you to improve sound quality while minimizing external noise intrusion, creating a more controlled recording environment.
Sealing gaps and blocking sound leaks — why your door is your biggest weak spot
The door is often the most overlooked source of sound leakage in a closet. For tips on sealing gaps, see this article on acoustic sealing. Small gaps around the frame, hinges, or under the door can significantly undermine your efforts to contain sound. Sealing cracks with weatherstripping or acoustic sealant creates an airtight barrier, which is crucial because even tiny gaps can allow enough sound to escape or enter, compromising your recording environment. For example, adding weatherstripping around the door frame can reduce noise leaks by up to 50%, making a noticeable difference in sound clarity.
Blocking gaps around the frame with a blanket or draft stopper can serve as an effective quick fix, especially if you’re in a pinch. However, for a more permanent solution, consider installing a door sweep or a solid door seal kit designed for acoustic isolation. Remember, the goal is to prevent sound from bouncing back into the closet or leaking out into adjacent spaces, which also helps keep external noise from contaminating your recordings.
Think of the door as part of your acoustic armor. Hanging a quilt or blanket across it can dramatically improve sound isolation, but sealing the edges with proper materials ensures a more robust barrier against unwanted noise, leading to cleaner recordings and less noise bleed.
Taming low frequencies — do you need bass traps in a tiny closet?
Low-frequency issues are common in small booths because sound waves at bass frequencies tend to bounce between parallel surfaces, creating standing waves and boomy sounds. These manifest as muddiness and lack of clarity in your recordings. Bass traps, especially in the upper corners, are designed to absorb these low-end resonances, but in tiny closets, their effectiveness can be limited by space constraints. The key is to understand that low frequencies are less directional and more about the room's overall acoustic response.
Hanging foam bass traps or thick panels in the corners can help reduce the buildup of low frequencies, but they shouldn’t be the sole focus. Instead, broad broadband absorption—covering multiple surfaces—often provides a more balanced reduction of problematic resonances. For example, thick acoustic panels placed along walls or a combination of foam and soft furnishings can diffuse and absorb a range of frequencies, including lows.
In tiny spaces, controlling reflections and adding soft, absorptive materials generally addresses low-end muddiness more effectively than focusing solely on bass traps. The goal is to create a uniform acoustic environment where low frequencies are less prone to buildup, resulting in clearer, more natural recordings.
How to keep your rig cool and quiet in a closet — ventilation tricks
Heat buildup is a real challenge when placing powerful electronics in a sealed closet. Overheating can cause equipment to throttle performance, generate noise from fans, and even risk damage. Proper ventilation is essential to maintain a stable temperature and keep noise levels down. Passive vents or active exhaust fans can create a continuous airflow, removing hot air and bringing in cooler ambient air. The key is to implement a system that balances cooling efficiency with noise minimization.
For example, installing a quiet, low-noise exhaust fan on one side of the closet and a vent hole on the opposite side can establish a natural airflow loop. Using a temperature-controlled vent system ensures the environment stays within safe operating temperatures without the fan running constantly. If you prefer a sealed setup, consider ducted ventilation with soundproofing features—these engineered solutions balance the need for cooling with noise reduction, preventing fans from adding unwanted noise to your recordings.
Effective ventilation isn’t just about comfort; it’s about protecting your gear and ensuring consistent recording quality. Properly designed airflow systems help you avoid overheating, reduce fan noise, and maintain a stable environment—vital for long recording sessions and equipment longevity.
The hybrid approach: combining absorption, sealing, and ventilation
The most successful closet rigs don’t rely solely on one technique but instead integrate multiple strategies to create an optimal environment. Combining internal absorption—using blankets, foam panels, or diffusers—with sealing gaps around the door and frame enhances sound containment. Simultaneously, implementing an effective ventilation system ensures the space remains cool and prevents heat buildup that could compromise equipment or introduce fan noise.
This hybrid approach allows you to tailor your setup to your specific needs, balancing sound quality, noise isolation, and thermal management. For example, a DIY closet studio might incorporate foam panels on the walls, weatherstripping around the door, and a quiet exhaust fan with ducting. This synergy results in a space that sounds good, stays cool, and keeps external noise out.
Ultimately, integrating multiple techniques provides a more robust and reliable solution than relying on a single fix. It’s about creating a balanced environment where your recordings are clear, your equipment runs efficiently, and noise leaks are minimized. This approach is adaptable and scalable, making it suitable for various budgets and space constraints.
Frequently Asked Questions
Is a closet booth actually soundproof?
Not entirely. A closet booth primarily acts as an absorption chamber, reducing reflections and echo. To achieve soundproofing, you need to seal gaps and block sound leaks, which is a more involved process. Still, it’s usually enough for vocals and podcasts at home.What is the difference between acoustic dampening and soundproofing?
Acoustic dampening reduces echoes and internal reflections, making your recordings clearer. Soundproofing blocks sound from escaping or entering the space. In a closet, your focus is usually on dampening for better sound quality, with some sealing for noise containment.Where should I place foam or panels in a closet studio?
Start by treating the reflection points behind the mic and the nearest walls. Cover the ceiling and door area as well. Broad coverage — especially on walls facing each other — helps minimize early reflections and echo. Avoid only focusing on corners; treat multiple surfaces.Should I treat the corners or the walls first?
In small spaces, broad wall treatment often yields better results than just corner bass traps. While corners can help with low-end issues, focusing on the main reflection points and covering more surfaces typically makes a bigger difference for overall sound clarity.Do moving blankets work better than foam?
Moving blankets are excellent for quick, budget-friendly absorption — they absorb midrange and high frequencies well. Foam panels are more precise but can be more expensive. Combining both, along with sealing gaps, usually gives the best results.Conclusion
Turning a closet into a sound-friendly space is about smart treatment, strategic placement, and good ventilation. It’s not about perfect soundproofing—it's about controlling reflections and leaks while keeping your rig cool.
Next time you see a tiny closet, think of it as a secret weapon. With some simple tweaks, it can produce pro-quality recordings without costing a fortune or turning into a sauna. Your perfect home studio might just be hiding behind that door.